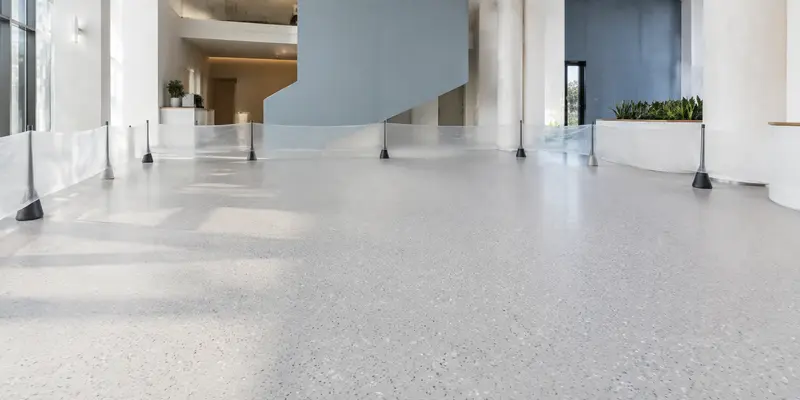
Can Polymer Terrazzo Floor Coating Be Applied Over Tile or Concrete?
Yes over suitable concrete, but not directly over ordinary ceramic, glazed, or non-porous tile with the current DIMERY polymer terrazzo floor coating system. Concrete must be strong, dry, clean, level, and mechanically prepared. For a tiled floor, the safer DIMERY route is to remove the tile, inspect and repair the concrete below, and then install the approved primer, intermediate layers, and decorative finish.
Some resin flooring systems are designed to go over prepared tile, but that practice cannot be transferred automatically to every product. For the current DIMERY system, any alternative needs technical review, adhesion testing, and written system confirmation.
Polymer Terrazzo Floor Coating Over Tile or Concrete: Direct Answer
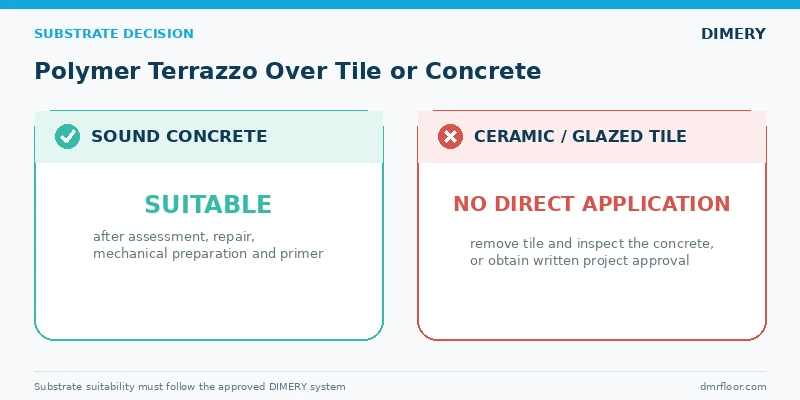
The correct answer depends on both the substrate and the approved polymer terrazzo flooring system.
| Existing substrate | DIMERY suitability | Main reason | Recommended action |
|---|---|---|---|
| Sound concrete | Suitable after assessment and preparation | Concrete can provide a strong, profiled bonding surface | Test, repair, grind or shot blast, vacuum, prime, and install the approved system |
| Weak or dusty concrete | Not suitable as found | The coating will only be as strong as the weak surface below it | Remove unsound material and rebuild or strengthen the substrate |
| Damp concrete or a slab with moisture risk | Do not coat until resolved | Moisture can cause blistering, loss of adhesion, or delamination | Test moisture, identify the source, and use an approved moisture-control solution if applicable |
| Ceramic, glazed, or non-porous tile | Not approved for direct application under the current DIMERY instructions | Smooth, impermeable surfaces and uncertain tile-to-slab bonding create adhesion risk | Remove the tile and prepare the underlying concrete |
| Loose, hollow, or cracked tile | Unsuitable | Movement or bond failure below the coating will transfer into the new floor | Remove the tile, repair the base, and reassess |
| Existing resin or painted floor | Conditional | Old coatings may be contaminated, incompatible, or poorly bonded | Remove all loose or delaminated material and verify the remaining substrate |
A seamless surface cannot compensate for hollow tiles, weak concrete, active cracks, oil contamination, or rising moisture.
Resin Flooring Over Concrete: When Is the Substrate Suitable?
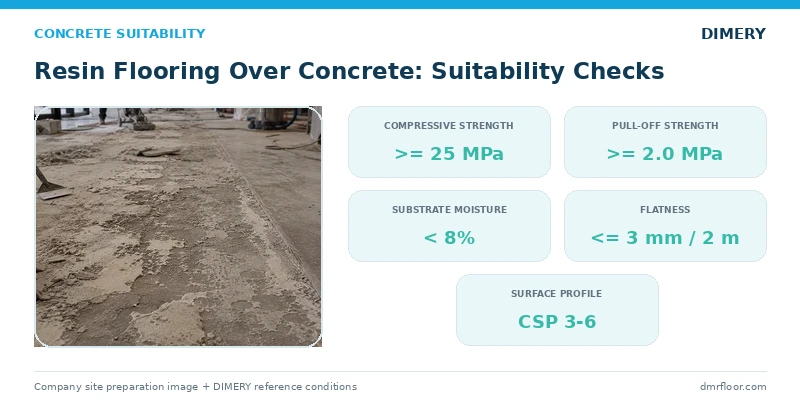
Resin flooring over concrete is normally the preferred renovation condition because mechanical preparation can expose a clean, strong, textured mineral surface. However, concrete is not automatically suitable just because it is hard.
For the DIMERY polymer terrazzo floor coating, the concrete should meet the following project checks:
Concrete compressive strength of at least 25 MPa.
Pull-off strength of at least 2.0 MPa.
Substrate moisture content below 8% under the referenced DIMERY conditions.
New concrete cured for at least 28 days.
Floor flatness deviation no greater than 3 mm under a 2 m straightedge.
Surface free from laitance, dust, oil, grease, curing compounds, sealers, loose coatings, and other bond-breaking contaminants.
Mechanically prepared concrete surface with an appropriate profile; DIMERY references CSP 3-6.
Effective damp-proofing where moisture may rise from below the slab.
These are product-specific reference conditions. Record the test method, location, result, and acceptance decision before installation.
Resin Flooring Over Tiles: Why Direct Application Is Restricted
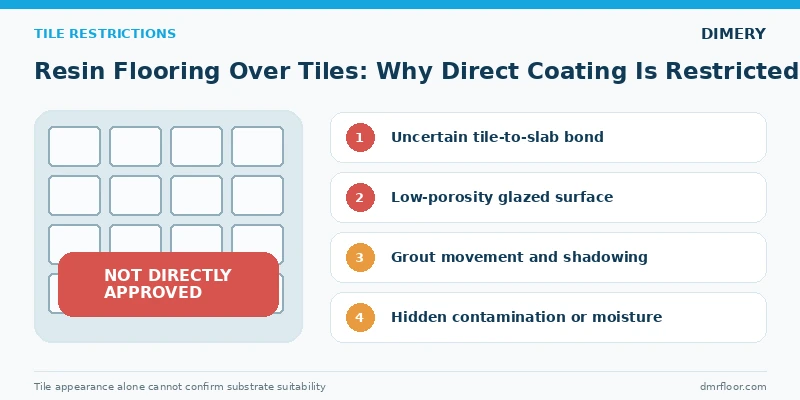
Many online articles answer “yes” to resin flooring over tiles, but only when tiles are firmly bonded, glaze is removed, grout is repaired and levelled, contamination is eliminated, and moisture is controlled. The new floor still depends on the original tile adhesive and bedding layer.
The current DIMERY product instructions are more restrictive. They list glazed tile, non-porous tile, and ceramic tile among the surfaces on which the product should not be installed directly. This limitation should take priority over generic epoxy-over-tile advice.
There are four main risks:
Uncertain bond below the tile. A coating may adhere to the tile while the tile itself later releases from the mortar bed or concrete.
Low surface porosity. Glazed and vitrified tiles provide little mechanical key unless aggressively prepared, and the required preparation may damage weak tiles or grout.
Grout-line movement and shadowing. Joints can remain visible through the finish or become crack paths if they are not rebuilt and levelled correctly.
Hidden contamination and moisture. Grease, detergent, sealers, water, or bacteria may remain in porous grout and bedding materials even when the tile surface looks clean.
Direct floor coating over tile should never be approved from photographs alone.
Floor Coating Over Tile: Remove It or Keep It?
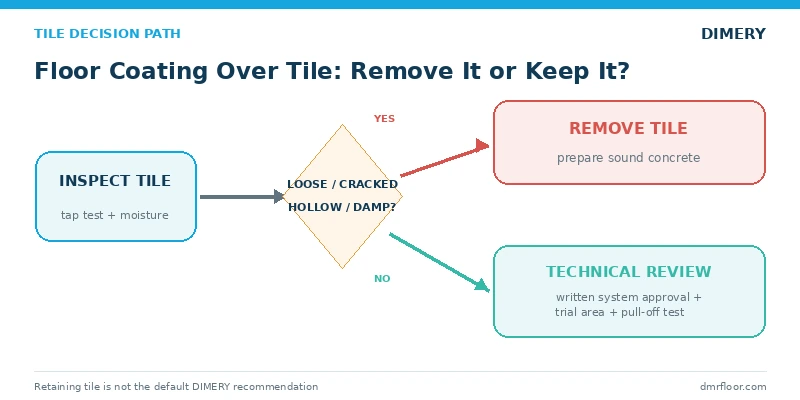
For the current DIMERY polymer terrazzo flooring system, tile removal is the normal recommendation. Removing the tile exposes the true structural substrate and allows the contractor to address moisture, cracks, laitance, contamination, flatness, and weak repairs before applying resin flooring.
Tile removal is particularly important when any of the following is found:
Hollow or “drummy” sounds during tap testing.
Loose, rocking, cracked, chipped, or tented tiles.
Deteriorated, contaminated, or missing grout.
Moisture intrusion, failed waterproofing, or repeated dampness.
Oil or grease exposure in kitchens, workshops, or service areas.
Structural cracks, significant movement, or deflection.
Large height differences, deep grout lines, or an uneven tile layout.
Unknown tile adhesive, bedding condition, sealer, or previous treatment.
If a project team wants to retain the tile because demolition is difficult, do not substitute an improvised primer or a generic internet method. Send DIMERY the tile type, site photographs, area, use environment, moisture information, and proposed preparation method. A trial area and pull-off adhesion test should be completed only under a project-specific, written system recommendation.
How to Prep Concrete for Epoxy Coating After Tile Removal
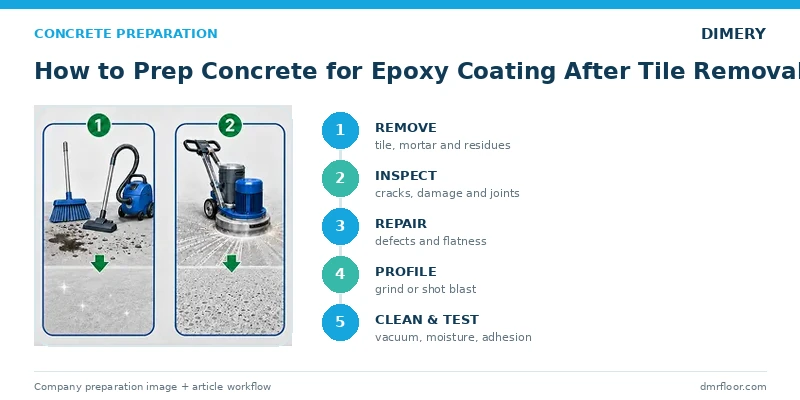
Knowing how to prep concrete for epoxy coating is more important than selecting the decorative color. After tile removal, the slab is often left with adhesive ridges, mortar patches, cracks, low areas, and local damage. These must be corrected before the decorative finish is applied.
Use the following sequence:
Remove tile and bedding residues. Expose sound concrete rather than leaving isolated adhesive islands or weak mortar attached to the slab.
Inspect the concrete. Map cracks, hollow areas, spalling, oil contamination, previous repairs, joints, and moisture-sensitive zones.
Remove contamination and laitance. Deep oil penetration may require removal and replacement of affected concrete rather than surface cleaning alone.
Repair defects. Treat cracks according to their type, rebuild damaged edges, and replace unsound concrete with compatible repair materials.
Correct flatness. Grind high points and fill low areas. Do not use the polymer terrazzo finish as a substitute for major levelling.
Create the required profile. Use suitable grinding or shot blasting to achieve the specified concrete surface profile without polishing the slab.
Vacuum thoroughly. Dust left after grinding can become a weak separation layer.
Re-test critical conditions. Confirm moisture, strength, flatness, cleanliness, and environmental conditions before priming.
Apply the approved primer and intermediate layers. Follow the specified recoat intervals and avoid leaving a smooth, contaminated intermediate surface.
Install a trial area when risk remains. Check appearance, flow, adhesion, pinholes, joint treatment, and the proposed installation sequence.
Epoxy Floor Substrate Moisture and Adhesion Tests
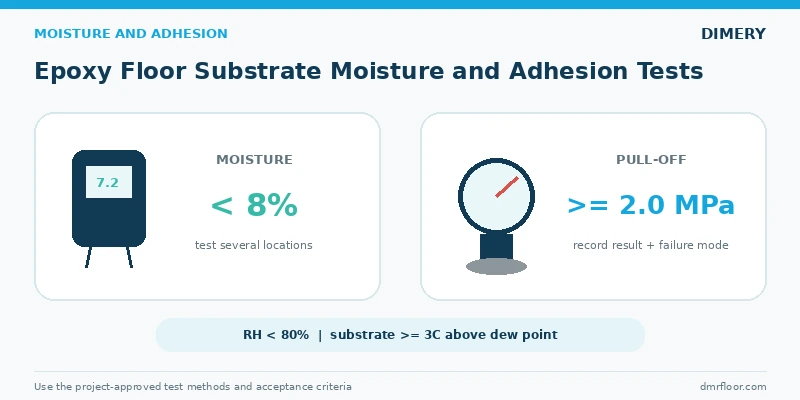
Epoxy floor substrate moisture is a major renovation risk because the top surface can appear dry while vapor continues to move through the slab. DIMERY references a substrate moisture content below 8%, relative humidity below 80%, and a substrate temperature at least 3°C above the dew point. The recommended application temperature is 15-35°C, with 20-25°C preferred.
A complete assessment should not rely on one handheld reading. Use appropriate test methods and record several locations, especially near external walls, drains, repaired zones, and areas previously covered by impermeable tile.
Pull-off testing helps show whether failure occurs within concrete, at the prepared surface, in a repair layer, or at an old coating interface. DIMERY references at least 2.0 MPa; record the failure mode with the numerical result.
If the floor shows active rising moisture, do not assume the decorative resin finish is a moisture barrier. Identify the source and obtain approval for a compatible moisture-control system before continuing.
Resin Floor Resurfacing System for Old Concrete
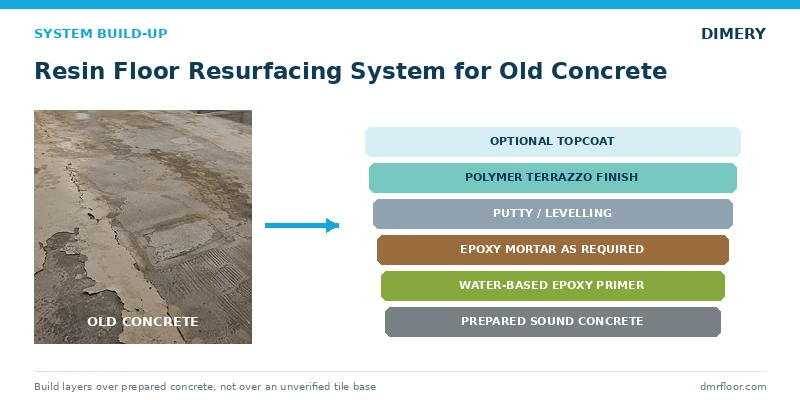
A reliable resin floor resurfacing specification separates substrate correction from the decorative finish. A typical DIMERY system may include:
Prepared concrete substrate.
Water-based epoxy primer.
Intermediate epoxy mortar where repair or build is required.
Intermediate epoxy putty or levelling layer.
Polymer terrazzo decorative finish.
Protective topcoat when required by the service environment.
The exact build-up depends on substrate condition, traffic, cleaning, slip resistance, appearance, and downtime. The finish should not be expected to fill deep depressions or stabilize a weak base.
DIMERY recommends approximately 2 mm for the final decorative finish layer. This thickness is separate from repairs, levelling, primer, intermediate coats, and any protective topcoat. For installation steps and layer coordination, refer to the DIMERY installation guide.
Industrial Floor Resurfacing: When Full Removal Is Safer
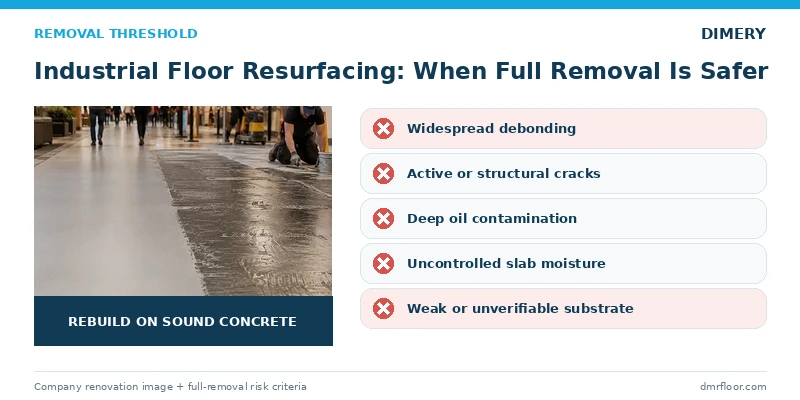
Industrial floor resurfacing is intended to reduce unnecessary demolition, not to preserve every existing layer. Full removal is safer when the existing floor has widespread debonding, active movement, deep contamination, severe moisture problems, weak concrete, or multiple incompatible coatings.
Use removal rather than overcoating when:
More than isolated areas are loose or hollow.
Cracks continue moving or indicate structural problems.
Oil has penetrated below the surface preparation depth.
The slab or screed lacks the required strength.
Moisture cannot be controlled within the selected system limits.
Existing tile, adhesive, mortar, or coating condition cannot be verified.
Grinding reveals widespread failure instead of a stable surface.
The required floor height, drainage, or joint detail cannot be achieved by resurfacing.
Partial removal creates transitions that must be detailed carefully. The lowest-demolition option is not always the lowest-risk option.
Polymer Terrazzo Flooring System Pre-Installation Checklist
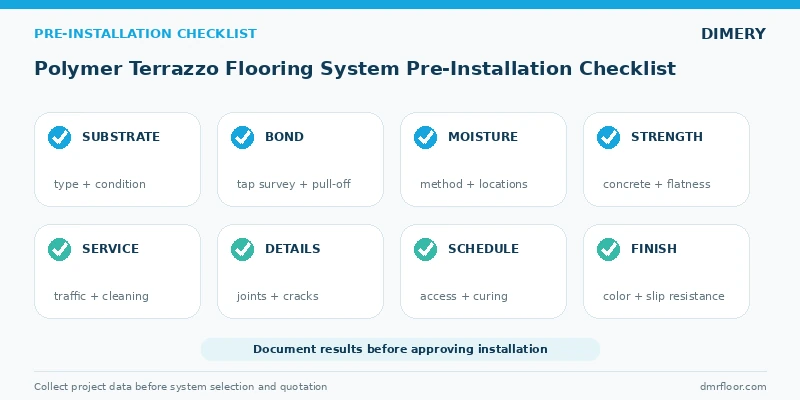
Before confirming a polymer terrazzo flooring system for renovation, collect the following information:
| Check | Information required | Decision supported |
|---|---|---|
| Existing floor | Concrete, ceramic tile, terrazzo, resin, paint, screed, or mixed substrate | Determines whether removal and specialist preparation are required |
| Bond condition | Tap survey, loose areas, cracks, and pull-off results | Determines whether the existing base can remain |
| Moisture | Test method, locations, results, and moisture source | Determines whether coating can proceed or mitigation is needed |
| Strength | Concrete compressive and pull-off strength | Confirms whether the substrate can support the system |
| Contamination | Oil, grease, detergent, sealer, wax, salts, and old adhesive | Defines cleaning or removal depth |
| Flatness | 2 m straightedge results and local level changes | Defines grinding, repair, and levelling quantities |
| Joints and cracks | Type, width, movement, and layout | Defines repair and joint-retention details |
| Service conditions | Traffic, impact, cleaning, chemicals, wet areas, and temperature | Defines layer build-up and topcoat requirements |
| Schedule | Available shutdown, curing window, and access | Defines work zones and installation sequence |
| Finish | Color, texture, slip resistance, and sample approval | Defines the decorative specification |
For a renovation review, send substrate photographs and project details through the DIMERY floor renovation solution. Product information is available on the polymer terrazzo floor coating page.
Polymer Terrazzo Floor Coating FAQs
Can polymer terrazzo floor coating go directly over concrete?
Yes, when the concrete is strong, dry, clean, level, and mechanically prepared. For the current DIMERY reference, new concrete should cure for at least 28 days, moisture should be below 8%, compressive strength should be at least 25 MPa, pull-off strength should be at least 2.0 MPa, and the prepared profile should meet the approved system requirement.
Can DIMERY polymer terrazzo floor coating go directly over ceramic tile?
No under the current standard product instructions. Glazed tile, non-porous tile, and ceramic tile are listed as unsuitable direct substrates. The normal route is tile removal followed by inspection and preparation of the concrete below.
Can grinding make every tiled floor suitable for resin flooring?
No. Grinding may remove glaze, but it does not repair a weak tile-to-slab bond, active cracks, moisture below the tile, contaminated grout, or deteriorated bedding. Grinding can also cause marginal tiles to crack or release.
How do you identify loose or hollow tiles?
A trained contractor may use tap or chain-drag sounding to identify hollow areas, followed by selective removal to inspect the bedding and concrete. Visual inspection alone is not enough.
Will grout lines show through a resin floor coating?
They can. Grout joints create differences in depth, porosity, and movement. They must be removed, repaired, filled, levelled, or otherwise treated under an approved system. With the current DIMERY system, removing the tile is the standard recommendation.
Can polymer terrazzo bridge structural cracks?
No. Active or structural cracks must be assessed and detailed separately. A decorative resin layer should not be used to hide ongoing substrate movement.
What project information does DIMERY need?
Provide the country and city, net area, existing substrate, floor photographs, tile condition, moisture and strength results, cracks and joints, required finish thickness, traffic and cleaning conditions, color target, and project schedule. This allows the technical team to recommend removal, preparation, system layers, and material quantities.
Resin Flooring Over Tiles or Concrete: Final Recommendation
Concrete is the preferred substrate for the current DIMERY polymer terrazzo floor coating when it meets the specified strength, moisture, flatness, cleanliness, and surface-profile requirements. Ceramic, glazed, and non-porous tiles should not be coated directly under the standard instructions.
For a tiled renovation floor, remove the tile, assess the underlying concrete, repair and level the slab, complete moisture and adhesion checks, and then install the approved polymer terrazzo flooring system. If demolition is unusually difficult, request a project-specific technical assessment rather than assuming that generic epoxy-over-tile advice applies to this product.
Send DIMERY the floor area, site photographs, substrate information, test results, service conditions, and schedule to receive a layer-by-layer renovation recommendation.